
How does it work?


Create templates from your existing Word or PowerPoint files by inserting <<placeholder>> where you want the input data.
See topics:

Link your templates to EmbaDoc by just
drag and drop


No more filling out repetitive information many times !
See topics:


Effortlessly save your input data while generating documents with
Store Data option.
See topics:
More about Data Collection:


EmbaDoc Tutorial
Topics:

Quick Start in 3 steps (1/3)
STEP 1 Creating a Template
1. Open Your Document: Start by opening a Microsoft Word or PowerPoint file you want to use as a template.
2. Insert Placeholders: Replace the text in your document with placeholders using the format << >>
-
Example: Replace John Doe with <<client name>>, 123 Main Street, Springfield with <<client address>>, etc.
3. Save Your Template: Save the file after adding all placeholders.
This template can now be linked to EmbaDoc and used to generate documents with different data.
Quick Start in 3 Steps (2/3)
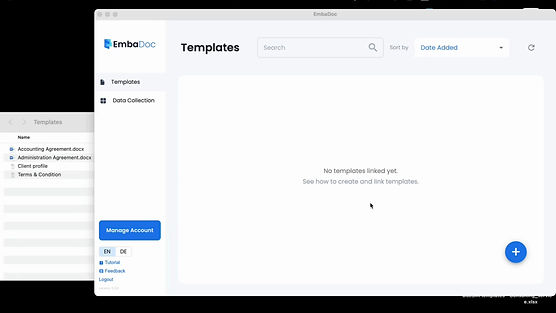
STEP 2 Linking Templates in EmbaDoc
1. Go to Templates Section: Open the Templates section in EmbaDoc.
2. Link Your Template Files:
-
Click the "+" symbol at the bottom right.
-
Drag and drop your template files or folders.
-
Or click "Choose Template Files" to select and link individual template files.
-
Alternatively, click "Choose Template Folders" to link all templates from a specific folder.
EmbaDoc will recognize all placeholders in the linked template files.
Entering Data and Generating Document

Save Data Collection: Store Together

Save Data Collection: Store Seperately

Quick Start in 3 Steps (3/3)
3. Entering Data and Generating Documents
Fill out one form to create multiple customized documents instantly.
1. Select Your Template(s): In the Templates section, choose one or more templates you want to work with. Click "Proceed" to continue.
2. Fill Out the Form: EmbaDoc will display a form with fields based on the placeholders in your selected template(s). Enter the necessary data for each field.
-
Example: For <<client name>>, enter John Doe; for <<client address>>, enter 123 Main Street, Springfield.
Name Your Document: Add a custom name in the "File Suffix" field. If left empty, EmbaDoc will automatically use the creation date and time as the suffix.
Save Data Collection (Optional): Toggle the "Save to Data Collection" option to save the data in Data Collection(s). Choose to store all data together or separately.
-
Store Together: Save the input data for all selected documents in one data collection. Each document’s information will be stored in separate columns within the same table.
-
Store Separately: Choose different data collections for each document. The data for each document will still be stored in separate columns, but in different tables based on your selection.
Select Data Collection(s): Choose existing Data Collection(s) or create a new one to store the information.
3. Generate Document: After completing the form, click "Generate" and then "Export" to save your document(s) to your preferred location.
Other Features:
Managing Linked Templates:
-
Right-click on a template to open the context menu. Here, you can choose to open the file, open the folder, relink, unlink, or set a default data collection for the template.
-
You can also set a default data collection for each template to streamline the document generation process.
Working with Data Collections:

The Data Collection section allows you to manage and view all saved data collections. You can open a data collection to view details such as the template name, file suffix, and any input data associated with the documents generated.
Data collections can be exported or deleted directly from this section. You can also generate new documents using existing data collections.
Generating new documents from an existing Data Collection:

-
On the Data Collection page, select the desired Data Collection.
-
Select one or more relevant columns. (These columns contain the input information from previously created documents where the "Save to Data Collection" option was selected.)
-
You can also edit the information by clicking on the cell you want to adjust.
-
Click "Generate" to create new document(s) with the selected information.
Export Data Collection:

-
You can export data collections to Excel for further processing or reporting. This feature is useful for keeping a record of all generated documents and associated data.
-
On the Data Collection page, select the desired Data Collection.
-
Click the export icon in the top right corner to export the Data Collection to an Excel file.
-
Choose the location where you want to save the file and click Export.
Sidebar Options in EmbaDoc:
-
Language Switcher
Click EN for English or DE for German to switch the interface language.
-
Tutorial
Click Tutorial for a step-by-step guide on using EmbaDoc.
-
Feedback
Click Feedback to submit your comments or suggestions.
-
Logout
Click Logout to sign out of your account.